How to Pack the Perfect Picnic
Photography by Aaron McLean .
Carefree summer picnics are as much about the packing as the food. Here are Victoria Ross' top tips for getting organised for a season of outdoor eating.
Summer is the time for casual – and often impromptu – gatherings with friends or family. On the beach or in the park, wherever the mood takes you. Don’t waste time and lose the moment by looking for the hamper, searching for the bottle opener at the bottom of the drawer or trying to decide which plates to take.
Spend a little time creating a picnic kit with all of the essentials at the beginning of summer. It can sit by the front door or in the boot of the car ready to be put into action at a moment’s notice. With a little bit of forward planning you can arrive at a picnic with food at the perfect temperature and all the tools you’ll need.
• Include a blanket or a tablecloth with matching napkins. Use it as the last item to go in the basket and it will act as an insulator for cold food and it’s the first thing needed when unpacking.
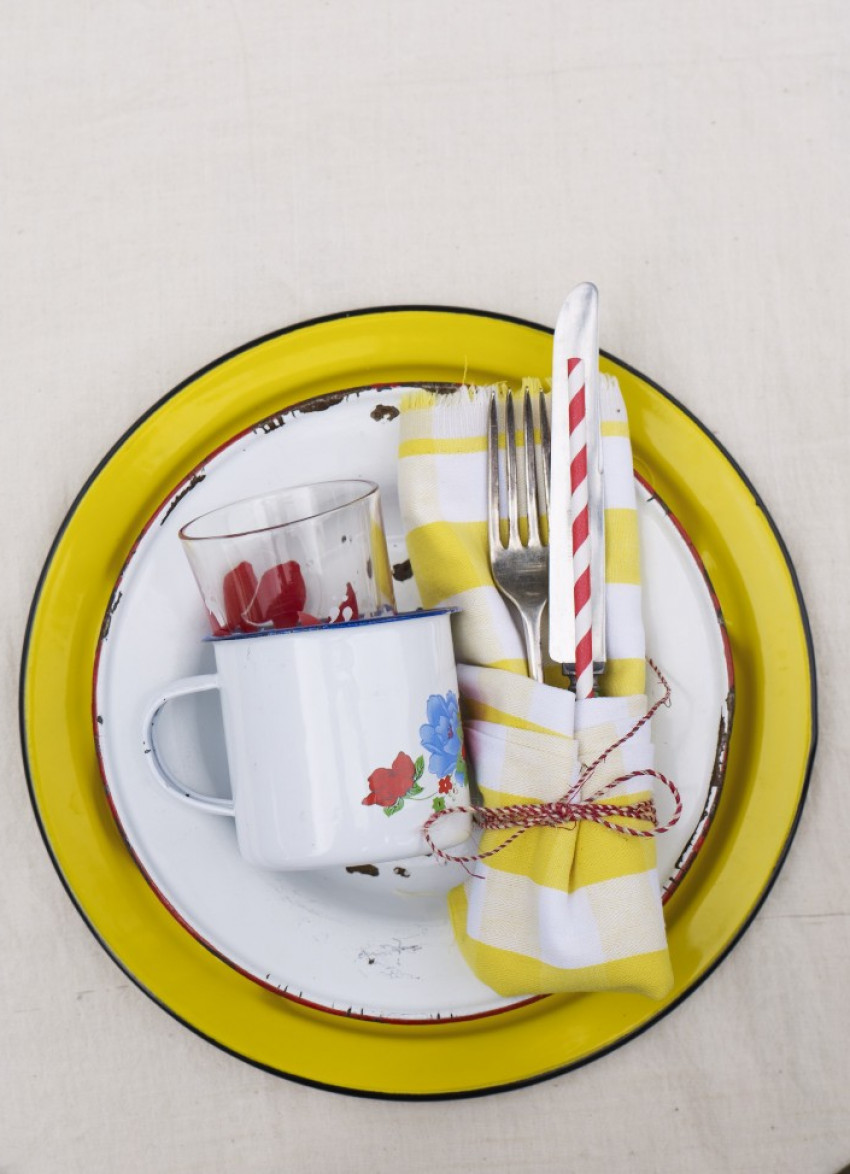
• Enamel and picnics go hand in hand. Enamelware is light, indestructible and stacks well. To create a nice little package for each of your guests, choose a large cotton napkin or tea towel, place an enamel plate in the middle of it and lay a reusable champagne flute on top. Fold the napkin around the plate like a gift and tie it up with string. Tie a knife, spoon and fork into the knot.
• Alternatively seek out ecologically conscious products. For instance Wasara disposable tableware is made from reed, bamboo and bagasse pulp – materials which are sustainable and biodegradable. There are also plates made from potato or palm leaves that have fallen to the ground.
• There’s always a need for miscellaneous items: 2-3 cheese knives, a folding knife such as Opinel, serving spoons, a small pair of tongs, a corkscrew with a bottle opener, a small ladle for drinks, as well as salt and pepper. A nice trick to keep these together is with a piece of cloth stitched to create pockets for each item. This can be rolled up and tied so that it can tuck into a small space in the basket. It also means that most necessary tools will be ready to go in one place, whether you’re having a simple picnic or something more elaborate.
• In a reusable container or bag, keep these handy items: a few recycled bags for rubbish; insect repellant; sunscreen; citronella candles; matches.
• Rather than use disposable hand wipes why not take a lesson from parents or grandparents generation and include wet flannels for a refreshing start to the meal, or as a means to clean sticky fingers at its end? Wet a few small flannels then wring them out, fold them in half and roll them tightly lengthwise. Place them in a small reusable container and pop them in the freezer. They’ll be thawed by the time you need them, and will be lovely and cool.
After spending so much time preparing your picnic, it is important to know how to pack your food so that the cold food arrives cold and the hot items arrive hot. If possible, pack your basket in the order you will need the items. Your blanket needs to be used first, so place it at the top. Dessert or clean-up bags can be at the bottom. How you pack the picnic depends on the type of container you have. If you’re using an insulated bag, create a solid base with a thick piece of cardboard or very thin piece of wood so the heavy items don’t cave to the middle of the bag when it is lifted. Containers with solid bases, like a picnic basket or chilly bin, are easier to pack.
• Pack food in containers that have tight lids or can be securely sealed, so no liquid can escape. An easy way to ruin a picnic is to have liquid all over the blanket and serviettes.
• Place ice packs at the bottom, then place items that need to be kept the coolest on top. Slot frozen water bottles into spare spaces – they are a good way to keep a picnic cold and you can drink the water as it melts.
• If you’ve packed a large bottle of lemonade, chilled tea or sangria, place it in first and build the other items around it. If your chilly bin has wheels, place items with the most liquid closest to the wheels so they have the least chance to leak.
• Also try to arrange your food in order of consumption – desserts near the bottom, sandwiches and salads in the middle and nibbles near the top. Place the chilled flannels at the top for nice, clean hands to start the picnic. Ordering the food this way particularly makes a difference when using chilly bin or insulated bag as the less you open these, the cooler the food will stay.
• Slide your bamboo cutting board in on the side. Cutting boards are handy and perfect for serving cheese.
With these few simple tips, your picnic will arrive to your destination in tip-top shape. Happy summer dining.
Related Content


latest issue:
Issue #114
Autumn has arrived, and with it, the latest issue of dish, jam-packed with recipes that will have you fizzing to get in the kitchen! With a long Easter lunch featuring perfectly pink, blushing roast leg of lamb and wildly decadent baked mashed potatoes with caramelised onions, to simply scrumptious chocolate treats and sensational seasonal baking this issue has you covered - we reckon the Hot Cross Buns are our best yet! Salads make way for soothing soups, pies, puddings and our cover star beef cheek ragù with spaghetti – a must-make dinner for family and friends. With over 60 recipes in our latest issue there’s plenty of inspiration to keep you busy – and well-fed! Don’t forget to share your dish dishes with our Facebook community.